
Floor grinding and polishing is one of those trades where the difference between a professional result and a ruined floor comes down to process discipline. The right abrasive sequence, the right machine speed, the right water management — get these right and you can restore a neglected marble floor to a mirror finish. Get them wrong and you're looking at scratches, swirl marks, or a surface that won't take a polish no matter how many passes you make.
This guide covers the complete process for grinding and polishing marble, granite, terrazzo, and concrete floors — from initial assessment through final polish — with specific guidance on machine setup, abrasive selection, speed settings, and troubleshooting the most common problems.
Understanding the Floor Before You Start
Assess the surface condition
Before selecting your starting grit, assess what you're working with:
- Lippage — height variation between tiles or slabs. Significant lippage (over 1–2 mm) requires aggressive grinding to flatten before polishing can begin.
- Scratches and damage — deep scratches require lower starting grits to remove. Surface scratches can be addressed with mid-range grits.
- Previous coatings or treatments — wax, sealer, or coating residue must be removed before grinding. Coatings clog abrasives and prevent proper stone contact.
- Material hardness — marble and limestone are soft and respond quickly to abrasives. Granite and quartzite are hard and require more aggressive tooling and slower progression.
Identify the stone type
This determines your abrasive type, speed settings, and chemical treatments:
- Marble and limestone — soft, reactive to acid. Use neutral or alkaline cleaners. Polishes to a high gloss with fine abrasives.
- Granite and quartzite — hard, acid-resistant. Requires diamond abrasives throughout. Takes longer to polish but holds the finish well.
- Terrazzo — composite of stone chips in cement or epoxy matrix. Treat like marble for the stone chips; be aware the matrix may respond differently.
- Concrete — variable hardness depending on mix and age. May require densifier treatment before polishing.
Machine Selection & Setup
Choosing the right machine
For professional floor grinding and polishing, a variable speed floor grinder is essential. Fixed-speed machines force you to compromise — the speed that works for aggressive grinding on granite is too fast for polishing marble, and vice versa.
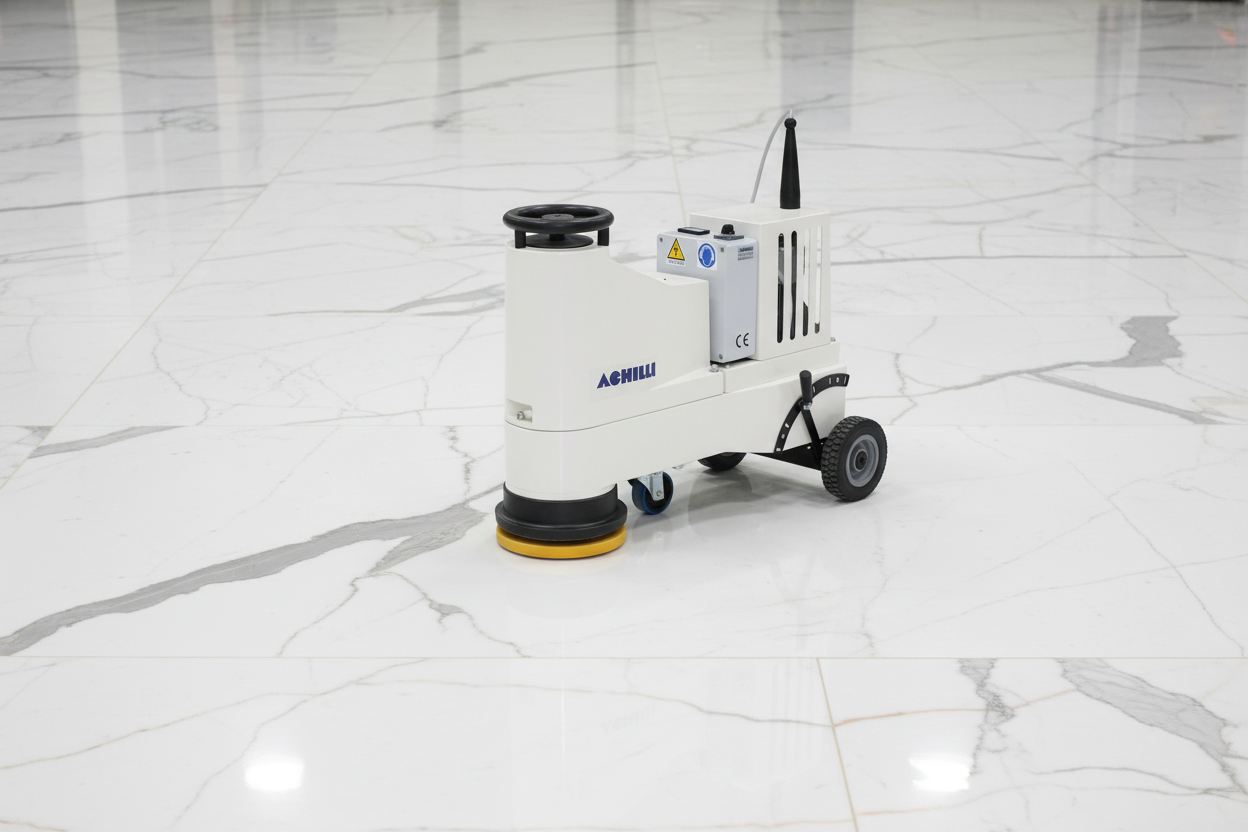
The Achilli LM30-VE Floor Grinder addresses this with four discrete speed settings (150, 351, 439, and 527 RPM) driven by a frequency inverter — not a simple speed switch. The inverter maintains consistent torque at each speed setting, which matters particularly at low RPM where consistent torque is critical for effective grinding on hard stone without stalling.
Plate system selection
The LM30-VE accepts three plate systems — prismatic, Frankfurt, and comma — covering the most common tooling standards in stone and concrete floor work. Match your plate system to the tooling you're using:
- Frankfurt system — the most common for marble and terrazzo. Wide range of abrasive options available.
- Prismatic system — common for granite and harder stone. Good for aggressive grinding applications.
- Comma system — used for specific abrasive types and applications.
Optional: Planetary head
For granite and hard stone, the optional planetary head attachment improves performance by creating a more consistent abrasive contact pattern across the plate. Worth considering for high-volume granite floor work.
Speed Selection Guide
The LM30-VE's four speed settings map to specific applications:
| Speed | RPM | Best For |
|---|---|---|
| Speed 1 | 150 RPM | Aggressive grinding on hard granite and concrete; lippage removal; coarse diamond tooling |
| Speed 2 | 351 RPM | Mid-range grinding on marble and terrazzo; transitioning from coarse to medium grits |
| Speed 3 | 439 RPM | Fine grinding and honing on marble; medium grit work on granite |
| Speed 4 | 527 RPM | Polishing and finishing on marble and terrazzo; final polish passes |
These are starting points — adjust based on material response, abrasive wear rate, and the finish you're achieving. If the abrasive is loading up (glazing), slow down. If it's wearing too fast without cutting, speed up or increase machine weight.
Abrasive Selection & Grit Sequences
Diamond abrasives vs resin abrasives
- Metal-bond diamond abrasives — for coarse grinding, lippage removal, and hard stone. Aggressive cutting, long life.
- Resin-bond diamond abrasives — for honing and fine grinding. Produces a smoother surface for polishing.
- Crystallization compounds — for marble and limestone polishing. Chemical reaction with the stone surface produces a high-gloss finish without abrasive action.
Grit sequences by application
Marble floor restoration (moderate damage)
- Metal-bond diamond: 50 grit — remove scratches and level surface
- Resin-bond diamond: 100 grit — refine the scratch pattern
- Resin-bond diamond: 200 grit — further refinement
- Resin-bond diamond: 400 grit — honing
- Resin-bond diamond: 800 grit — pre-polish
- Crystallization compound or resin-bond: 1500–3000 grit — final polish
Granite floor grinding and polishing
- Metal-bond diamond: 30–50 grit — aggressive grinding (granite requires more aggressive start)
- Metal-bond diamond: 100 grit
- Resin-bond diamond: 200 grit
- Resin-bond diamond: 400 grit
- Resin-bond diamond: 800 grit
- Resin-bond diamond: 1500 grit
- Resin-bond diamond: 3000 grit — final polish
Concrete floor grinding (preparation for coating or polish)
- Metal-bond diamond: 16–30 grit — aggressive surface removal
- Metal-bond diamond: 50–80 grit — refine
- Apply densifier (sodium or lithium silicate) — allow to cure
- Resin-bond diamond: 100–200 grit — honing
- Resin-bond diamond: 400–800 grit — polishing (if polished concrete finish required)
Wet vs Dry Grinding
Wet grinding
Water cools the abrasive and the stone, extends abrasive life, and controls dust. Required for most diamond abrasive work on natural stone. The LM30-VE's aluminum water tank with epoxy powder coating handles wet grinding without corrosion issues.
Manage slurry carefully — stone slurry is abrasive and will damage surfaces it's left to dry on. Vacuum or squeegee slurry regularly during grinding.
Dry grinding
Some resin-bond abrasives and crystallization compounds are designed for dry use. Dry grinding generates significant dust — use appropriate respiratory protection and dust extraction. Never dry grind with metal-bond diamond abrasives on natural stone.
Machine Technique
Overlap pattern
Work in overlapping passes — each pass should overlap the previous by 50% of the plate diameter. This ensures even coverage and prevents striping (visible lines where passes meet).
Machine level adjustment
The LM30-VE's eccentric wheel axis allows machine level adjustment to compensate for uneven floors. On floors with significant variation, adjust the machine level to keep the plate flat against the surface — a tilted plate grinds unevenly and leaves a curved scratch pattern.
Feed speed
Move the machine slowly and consistently. Too fast and the abrasive doesn't have time to cut; too slow and you risk burning the abrasive or overheating the stone. A consistent, steady pace produces the most even results.
Extra weight
The optional extra weight accessory for the LM30-VE increases grinding pressure for more aggressive material removal — useful for lippage removal and coarse grinding on hard stone. Remove the extra weight for polishing passes where lighter pressure produces better results.
Common Problems & Solutions
Swirl marks visible after polishing
The previous grit's scratch pattern wasn't fully removed before moving to the next grit. Go back one grit level and make additional passes until the swirl marks are gone before progressing.
Surface won't take a polish
Usually caused by skipping grits or moving through the sequence too quickly. The surface needs to be fully honed (scratch-free at the current grit) before polishing compounds will work. Also check for coating or contamination residue — any residue on the surface will prevent proper polishing.
Abrasive loading up (glazing)
Speed is too high, or the stone is too soft for the abrasive bond. Reduce speed, use a softer bond abrasive, or add more water to flush the abrasive surface.
Uneven finish across the floor
Inconsistent machine speed, inconsistent overlap pattern, or uneven machine level. Slow down, check your overlap, and verify the machine is level on the surface.
Lippage not removing after multiple passes
Starting grit is too fine for the amount of lippage. Drop to a coarser grit (30–50 metal-bond) and add extra weight to the machine for more aggressive material removal.
Frequently Asked Questions
How many grit steps do I need to skip before I see a problem?
Skipping even one grit step in the sequence usually shows up as visible scratches in the final polish that can't be polished out without going back. The rule is: each grit must fully remove the scratch pattern left by the previous grit before you move on. If you can still see the previous grit's scratches, you haven't finished that step.
Can I use the same machine for marble and concrete?
Yes — the LM30-VE's variable speed range and multi-system plate compatibility make it suitable for both. Use lower speeds and metal-bond abrasives for concrete; higher speeds and resin-bond abrasives for marble polishing. Change your tooling between applications.
What's the difference between honing and polishing?
Honing produces a smooth, matte or satin finish by removing scratches with fine abrasives (typically up to 800 grit). Polishing produces a reflective, glossy finish using very fine abrasives (1500–3000 grit) or crystallization compounds that react with the stone surface. Both start with grinding to remove damage and level the surface.
Do I need to seal the floor after polishing?
For marble and natural stone, sealing after polishing is recommended to protect the surface from staining. Use an impregnating sealer appropriate for the stone type. For polished concrete, a densifier and topical sealer or guard product is typically applied.
How do I know when to move to the next grit?
When the scratch pattern from the current grit is uniform across the entire area you're working — no deeper scratches from previous grits visible, no unground areas. Check by looking at the surface at a low angle in raking light, which makes scratch patterns visible.
What RPM should I use for marble polishing?
On the Achilli LM30-VE, Speed 4 (527 RPM) is the starting point for polishing marble. If you're using crystallization compounds, follow the compound manufacturer's recommendation — some work better at lower speeds.
Related Products
- Achilli LM30-VE Floor Grinder — variable speed floor grinder for marble, granite, terrazzo & concrete