
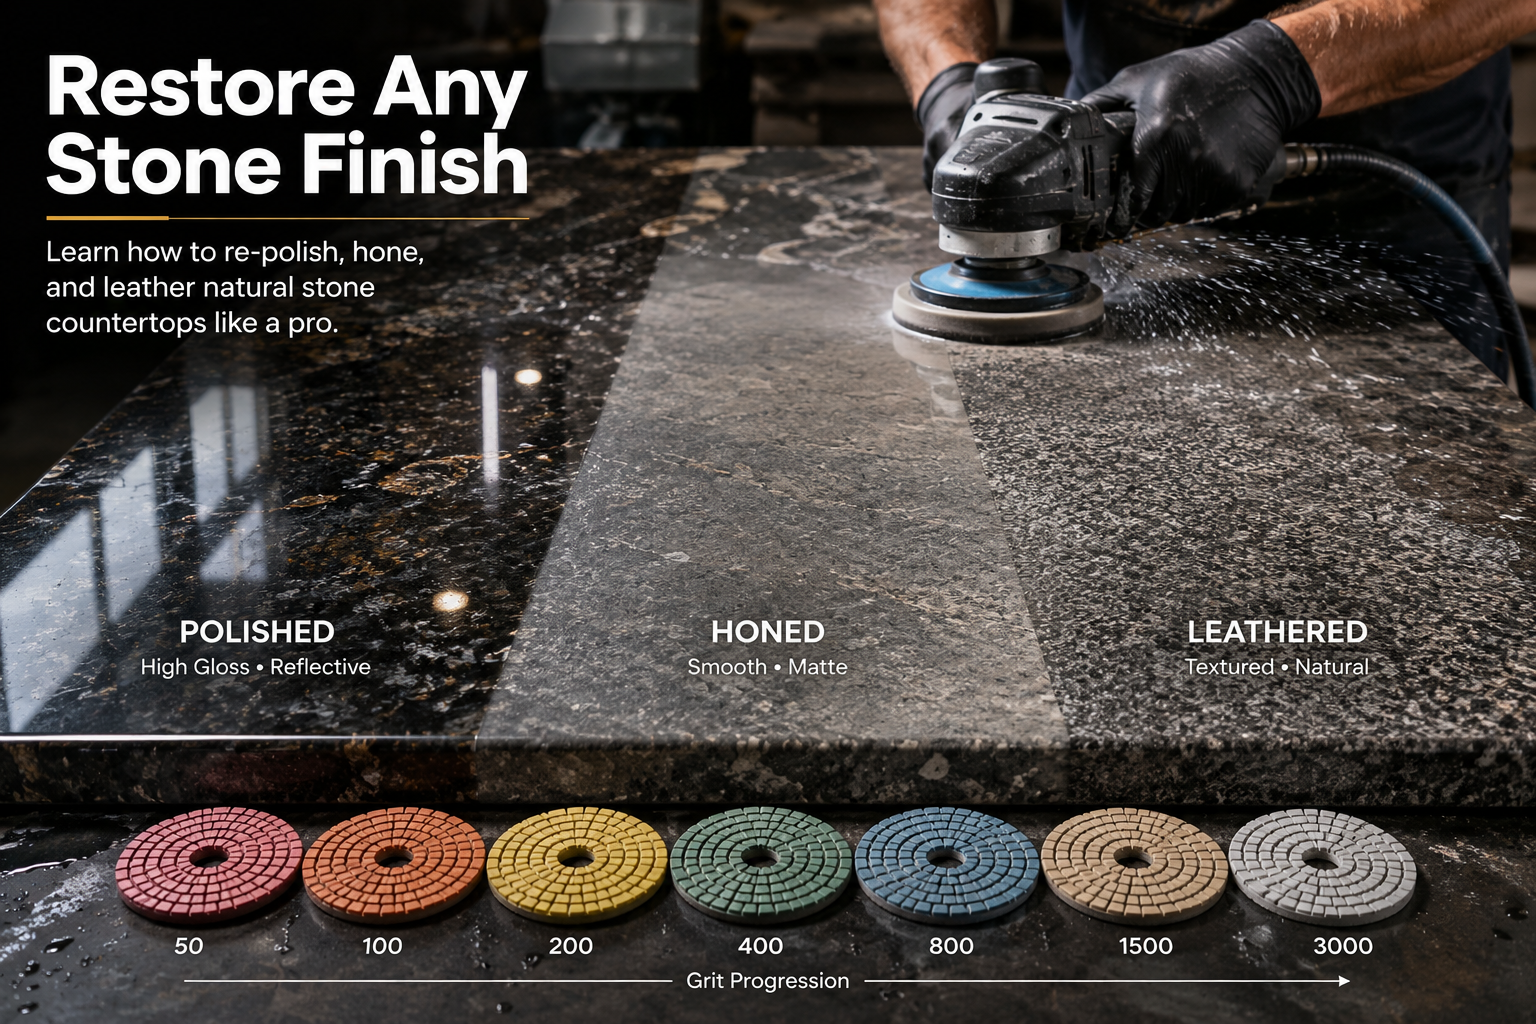
Stone countertops lose their finish over time — scratches accumulate, etching dulls marble, and high-gloss granite starts to look flat. The good news: most countertop surfaces can be fully restored to factory finish, or converted to a new finish (honed or leathered), without replacement. Here’s how each process works and what tooling you need.
The Three Finishing Workflows
1. Full Polish Restoration (Scratch Removal → High Gloss)
Best for: Granite, quartz, quartzite with scratches, swirl marks, or dull finish
Goal: Remove surface damage and restore factory-level gloss
Pad sequence (Weha Pig 350VS + Donkey Package):
| Step | Pad | Purpose |
|---|---|---|
| Step 0 | Pig Snail Lock Step 0 | Heavy scratch removal / surface prep |
| Step 1 | Pig Snail Lock Step 1 | Medium scratch removal |
| Step 2 | Pig Snail Lock Step 2 | Fine scratch removal / pre-polish |
| Step 3 | Pig Snail Lock Step 3 | Final polish |
| Optional | Donkey 600 → 1000 → 2000 → 3000 | Extended grit progression for maximum gloss |
Tips:
- Work wet. Use the Pig’s built-in reservoir for in-home jobs; connect to a garden hose in the shop.
- Overlap passes by 50% to avoid uneven finish.
- Finish with Tenax Granite Polishing Powder applied by hand for final gloss enhancement on granite.
2. Honing (Converting Polished to Matte/Satin)
Best for: Marble, limestone, travertine — or any stone where a low-sheen, fingerprint-resistant finish is preferred
Goal: Produce a flat, even matte or satin surface with no reflectivity
Pad sequence:
| Step | Pad | Purpose |
|---|---|---|
| Step 1–2 | Pig Snail Lock Steps 1–2 | Remove existing polish / flatten surface |
| Stop here | — | Do not proceed to Step 3 or Donkey pads |
Tips:
- For marble, use the optional Marble Package pads (softer stone formulation).
- Finish with Tenax Marble Polishing Powder by hand if a slight sheen is desired without full gloss.
- Honed surfaces are more porous — seal immediately after honing.
3. Leathering (Textured Matte Finish)
Best for: Granite, quartz, marble — adds tactile texture and hides fingerprints and water spots
Goal: Open the stone’s surface to create a brushed, textured finish
Tooling sequence:
| Step | Tool | Purpose |
|---|---|---|
| 1 | Tenax Filiflex or Airflex Brushes | Primary texturing — creates the leathered surface |
| 2 | Tenax Silicon Carbide Antique Finish Brushes | Refine texture on softer natural stone |
| Optional | Donkey 600–1000 | Light polish pass if a slight sheen is desired over the texture |
Tips:
- Use the Tenax Leather Package (optional upgrade for the Pig 350VS) — developed specifically with Tenax USA for leathered finishes.
- Work dry or with minimal water for leathering; excess water can interfere with brush action.
- Leathering is not reversible without a full re-polish sequence — confirm the finish with the customer before proceeding.
Machine Setup for All Three Workflows
The Weha Pig 350VS handles all three workflows from a single machine:
- Set speed low (300–400 RPM) for scratch removal and heavy texturing
- Increase to 600–800 RPM for polishing passes
- Use the extension handle for large islands and slabs on tables
- RPM memory function retains your last speed setting between passes
Finishing Touches
After any machine polishing sequence, a hand-applied polishing powder elevates the final result:
- Granite: Tenax Granite Polishing Powder
- Marble: Tenax Marble Polishing Powder
Shop the Weha Pig 350VS Planetary Polisher →
Replacement pads: Weha Donkey Face Polish & Inline Polishing Pads →
Leathering brushes: Tenax Filiflex & Airflex Stone Texturing Brushes →
Further Reading
- Planetary Polisher Buying Guide: Floor Machine vs. Countertop-Specific Design — understand why a purpose-built countertop polisher outperforms a modified floor machine before you buy