
A perfect 45° miter is one of the most demanding cuts in stone fabrication. The margin for error is zero — a miter that's off by even half a degree produces a visible gap at the joint, and on a waterfall countertop or book-matched cladding panel, that gap is the first thing a client sees.
This guide covers everything you need to cut accurate, repeatable 45° miters on granite, marble, quartz, quartzite, and sintered stone — from machine setup through blade selection, technique, and troubleshooting the most common errors.
Why Miter Cuts Are Difficult on Stone
Stone miter cuts are harder than wood miters for three reasons:
- Slab thickness variation. Natural stone slabs are rarely perfectly calibrated. A slab that varies 1–2 mm in thickness across its length will produce a miter angle that shifts with the thickness — even if your machine is set perfectly at 45°.
- No forgiveness. Wood miters can be adjusted with a hand plane or sander. Stone miters cannot. What comes off the saw is what you install.
- Material hardness. Hard stone like granite and quartzite resists the blade, increasing the risk of deflection and angle drift during the cut.
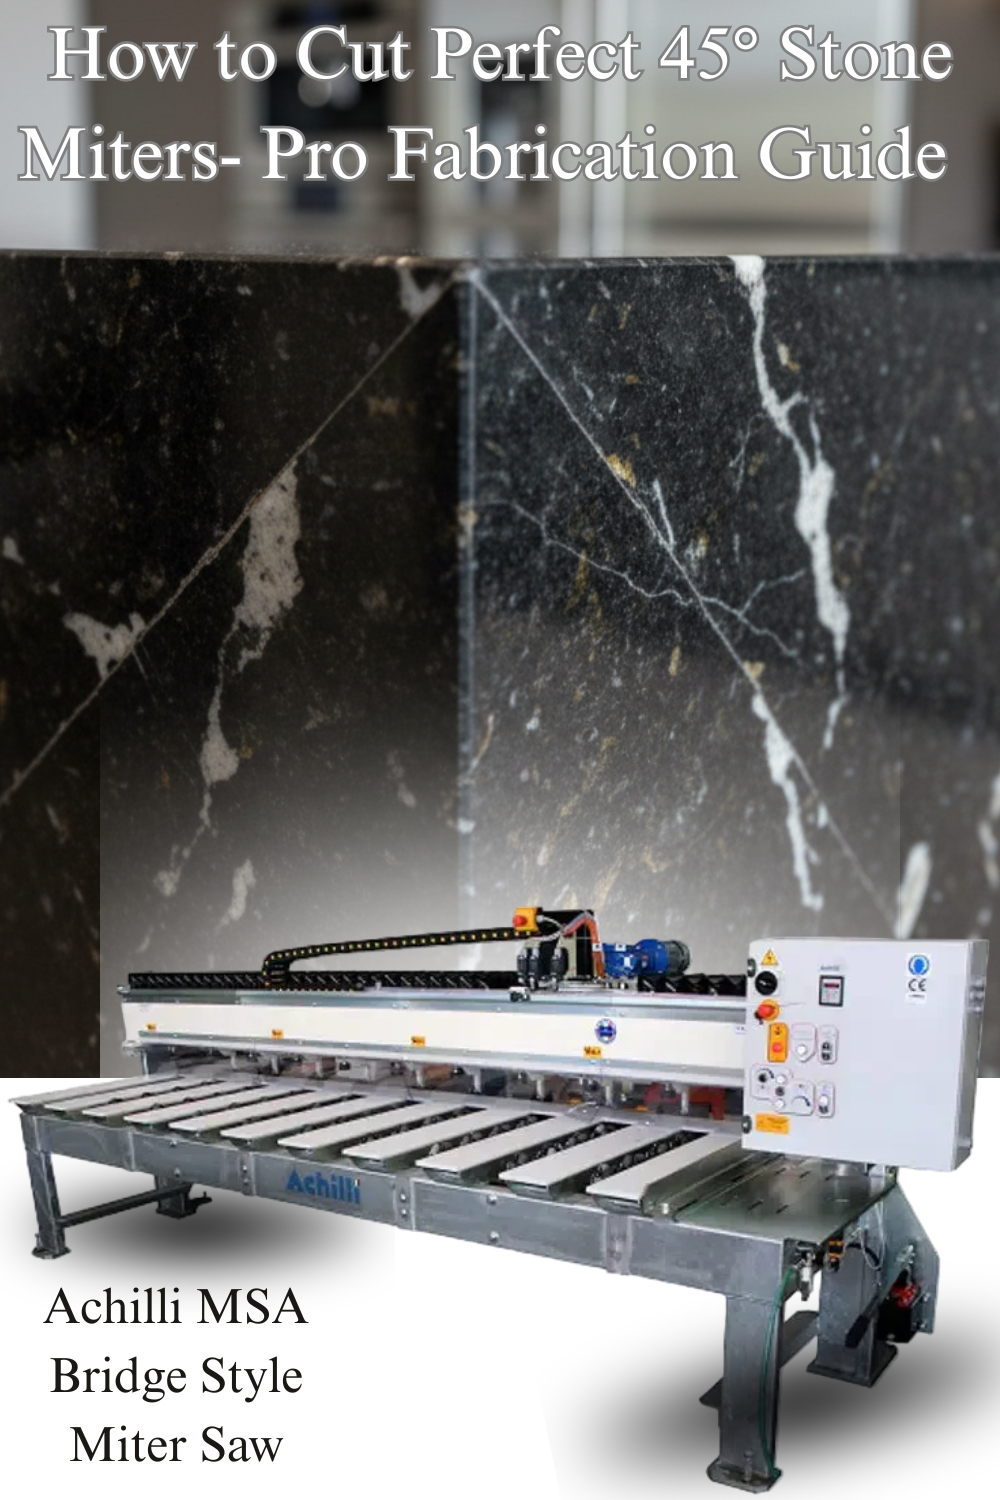
The Right Machine for Stone Miters
Not every saw is suited for precision miter work on stone. A standard portable bench saw can tilt its bridge to 45°, but the geometry isn't optimized for miter accuracy — you're fighting slab thickness variation with every cut.
A dedicated stone miter saw like the Achilli MSA Professional Miter Saw solves this with face-down cutting geometry. By processing the slab face-down, the finished face becomes the reference surface — thickness variation above the reference plane doesn't affect the miter angle. The result is a consistently accurate 45° miter regardless of slab calibration.
Key machine features to look for:
- Face-down cutting geometry — eliminates thickness variation errors
- Linear guides with recirculating ball slides — smooth, accurate head travel with no lateral play
- Motorized variable speed head feed — consistent feed rate regardless of material hardness
- No slab width limitation — open worktable handles full-width slabs without repositioning
- Pneumatic slab stops — secure, repeatable slab positioning without manual clamping
Blade Selection for Miter Cuts
Blade choice has a significant impact on miter quality. The wrong blade causes deflection, chipping, and angle drift.
Blade diameter
For miter cuts, use the largest blade diameter your machine supports. A larger blade presents more of its cutting surface to the stone at any given moment, reducing deflection and producing a flatter, more accurate cut face.
Segment type
- Continuous rim blades — best for marble and soft stone. Smooth cut edge, minimal chipping.
- Turbo segment blades — good for granite and harder stone. Faster cutting with acceptable edge quality for miters.
- Silent core blades — reduce vibration during cutting, improving edge quality on hard materials.
RPM matching
Run the blade at the correct RPM for its diameter and the material. Too fast on soft stone causes glazing; too slow on hard stone causes segment wear and deflection. Consult the blade manufacturer's recommended speed range and use a variable speed machine to dial it in.
Machine Setup for Accurate Miters
Step 1: Verify the 45° angle
Before cutting production material, verify your machine's 45° setting with a precision angle gauge — not just the machine's built-in indicator. Even a new machine can be off by a fraction of a degree from the factory. Set it, lock it, and verify it again after locking.
Step 2: Check blade runout
Blade runout (wobble) translates directly into miter angle variation. Check runout with a dial indicator before starting a miter job. Acceptable runout is typically under 0.1 mm. If it's higher, check the flange, arbor, and blade for damage or debris.
Step 3: Set feed speed
Miter cuts require a slower, more controlled feed than straight cuts — especially on hard stone. Set your feed speed conservatively and increase only if the blade is loading up. A consistent, controlled feed produces a flatter cut face and reduces the risk of angle drift.
Step 4: Position the slab
On a face-down machine like the Achilli MSA, place the finished face down on the worktable. Use the pneumatic slab stops to position the slab consistently — the same reference point on every piece. Mark your cut line on the back of the slab before positioning.
Cutting Technique
Make a scoring pass first
On hard stone and sintered materials, make a shallow scoring pass (3–5 mm depth) before the full-depth cut. This reduces chipping on the entry edge and gives the blade a clean path to follow on the full cut.
Maintain consistent feed pressure
On manual feed machines, inconsistent hand pressure is the most common cause of miter angle drift. Use a motorized feed if available. If feeding manually, use both hands and maintain steady, even pressure throughout the cut — don't slow down or speed up mid-cut.
Support the offcut
As the cut completes, the offcut piece loses support and can drop, causing chipping or blade binding at the end of the cut. Use a side table or roller support to hold the offcut level through the end of the cut.
Checking Your Miters
After cutting, check the miter angle with a precision angle gauge before moving to the next piece. On a production run, check every 3–5 pieces — blade wear and heat can cause gradual angle drift that compounds across a run.
To check joint fit, hold the two miter pieces together dry (no adhesive) and check for gaps with a feeler gauge. A gap of more than 0.5 mm at any point will be visible after installation and should be corrected before proceeding.
Common Miter Errors and How to Fix Them
Gap at the top of the joint (open at the face)
The miter angle is slightly over 45°. Check and re-verify your machine's angle setting. Also check for blade deflection — a blade that's deflecting away from the cut will produce an angle that opens at the face.
Gap at the bottom of the joint (open at the back)
The miter angle is slightly under 45°. Re-verify the angle setting. Also check for slab thickness variation if you're not using a face-down machine — the slab may be thicker at the cut point than where you set your reference.
Chipping on the miter face
Feed speed is too fast, blade is worn, or blade type is wrong for the material. Slow the feed, check blade condition, and switch to a continuous rim or silent core blade for cleaner edges on hard stone.
Angle drift across a production run
Blade wear or heat buildup is shifting the cut angle. Check blade condition, allow the blade to cool between cuts, and re-verify the angle setting mid-run.
Frequently Asked Questions
What is face-down cutting and why does it matter for miters?
Face-down cutting means the finished face of the slab rests on the worktable during cutting. This makes the finished face the reference surface, so any thickness variation in the slab occurs above the reference plane and doesn't affect the miter angle. The result is a consistently accurate 45° miter regardless of slab calibration — which is why dedicated stone miter saws like the Achilli MSA use this geometry.
Can I cut miters on a standard portable bench saw?
Yes, but with limitations. A standard bench saw with a tilting bridge can make 45° cuts, but it's not optimized for miter accuracy — slab thickness variation affects the angle, and consistent feed speed is harder to maintain manually. For occasional miter work on calibrated slabs, it's workable. For production miter work on uncalibrated stone, a dedicated miter saw is the right tool.
What materials are hardest to miter accurately?
Quartzite and sintered stone (Dekton, Neolith) are the most demanding — quartzite because of its hardness and tendency to cause blade deflection, sintered stone because of its brittleness and sensitivity to chipping at the miter edge. Both require slower feed speeds, sharp blades, and a scoring pass before the full-depth cut.
How do I fix a miter that's slightly off?
Small angle errors (under 0.5 mm gap) can sometimes be corrected by lapping the miter face on a flat surface with diamond abrasive. Larger errors require re-cutting. Prevention is always better — verify your angle setting before starting a production run and check fit every few pieces.
What blade size should I use for miter cuts?
Use the largest blade diameter your machine supports. Larger blades deflect less and produce a flatter cut face, which is critical for miter accuracy. On the Achilli MSA, that means 350–450 mm (14"–18") blades.
Related Products
- Achilli MSA Professional Miter Saw — dedicated 45° miter saw with face-down cutting geometry
- Achilli CMS Portable Wet Cut Sliding Compound Miter Saw — portable compound miter saw for marble and soft stone
- Achilli AFR-A Motorized Bridge Saw — motorized bridge saw with 45° tilt for shops needing both straight and miter cuts
- Achilli SC500 Slab Cart — hydraulic slab cart for safe slab loading onto the miter saw